How to convert LANCE NRT AMSR2 Snow data to GeoTIFF Format using Python
This code converts the snow water equivalent (‘SWE’) parameter in the AMSR2 NRT daily snow product in HDF-EOS5 format to GeoTIFF. Documentation is provided in the Python code to outline what each section of code does.

| Data Recipe Type | |
|---|---|
| Data Format Conversion | |
| TYPE | ACCESS | ||
|---|---|---|---|
|
| Python Script |
| Open Source |
This code converts the snow water equivalent (‘SWE’) parameter in the AMSR2 NRT daily snow product in HDF-EOS5 format to GeoTIFF. Documentation is provided in the Python code to outline what each section of code does.
The output projection information that will be used to georeference the Northern and Southern hemisphere AMSR2 NRT Snow data are defined. These projections are NSIDC EASE-Grid North and NSIDC EASE-Grid South.
![]()
Navigate to the folder on your computer where you have saved the AMSR2 NRT Snow HDF-EOS5 data file. From the address bar, copy the file path (i.e., ‘C:\Users\lwang\Documents\AMSR\data\’). Paste the file path within the quotation marks for the variable ‘h5file’ highlighted in blue below (Line 34). For Python, the backslashes need to be changed to forward slashes. At the end of the file path, add the filename of the AMSR2 NRT Snow file after the last forward slash as shown.
![]()
Users can set ‘useGIBScolors’ to True/False to elect the use of GIBS color scheme or not. In the case of using GIBS color scheme, unzip the colormaps.zip in the code folder (i.e., unzipped from Geotiff_recipes.zip) to get a folder labeled ‘colormaps’. It contains a set of GIBS colormap files to use. Save this folder on your computer. From the address bar, copy the file path (i.e., ‘C:\Users\lwang\Documents\AMSR\colormaps\’). Paste the file path within the quotation marks for the variable ‘gibsMapDir’ highlighted in blue below (Line 40). Again, the backslashes need to be changed to forward slashes.

The code defines which data parameter layer(s) in the HDF-EOS5 file will be used to create the GeoTIFF files. In this data recipe, a “for” loop is used to extract the “SWE_NorthernDaily” and “SWE_SouthernDaily” parameters and define the projection accordingly. Read latitude and longitude values from the input file (Line 69 to Line 72).
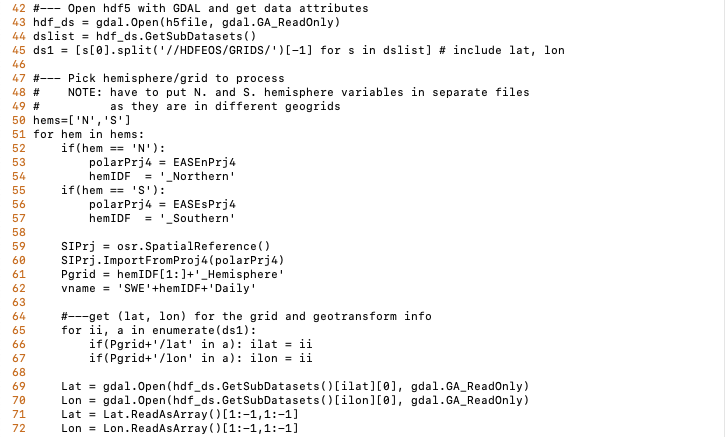
Perform a geographic transformation to georeference the data according to the NSIDC North/South EASE-Grid parameters:

Create and save a GEOTIFF file to a folder on your computer. Line 94 defines the GeoTIFF filename. Create or locate a folder on your computer where you would like this GeoTIFF file to be saved. As done in STEP 2, copy the file path and paste it within the code in the area highlighted in blue below. Make sure a forward slash is included at the end of the file path.

Simply run the code and check your output folder, two GeoTIFF files should now be located within the folder.
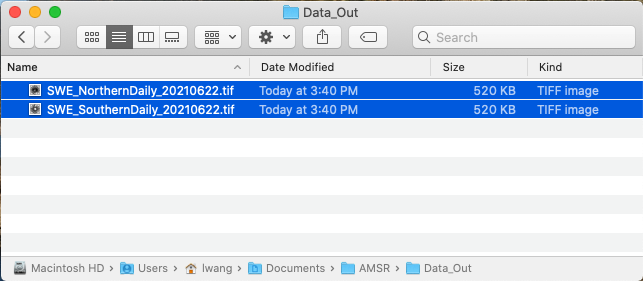
Example of GeoTIFF files created by this geotiff_snow.py:

| Dataset Name | NRT AMSR2 Unified L3 Global Daily 25 km EASE-Grid Snow Water Equivalent |
| Platform | Global Change Observation Mission - Water 1 (GCOM-W1) |
| Instrument | Advanced Microwave Radiometer 2 (AMSR2) |
| Science Parameter | Snow Water Equivalent |
| Format | HDF-EOS5 |
| Data Information |
|
| Variable | Description | Dimension | Units | Scale Factor |
|---|---|---|---|---|
| SWE_NorthernDaily | Daily snow water equivalent (SWE); Northern Hemisphere | 2D | mm | 1 |
| SWE_SouthernDaily | Daily snow water equivalent (SWE); Southern Hemisphere | 2D | mm | 1 |

Nov 12th, 2021